
Style & Tips
How to Wash Graphic Tees Without Ruining the Print
Mar
Your Favorite Graphic Tee Is Dying — Here’s How to Save It
You know that one graphic tee — the vintage band shirt you found at a thrift store, the limited-edition drop you waited in line for, the custom design from your favorite online store? It looked incredible the first time you wore it. Then you washed it. And washed it again. And now the print is cracking like a desert highway, fading like a bad Instagram filter, and peeling off in chunks every time it goes through the dryer.
Here’s the brutal truth: most graphic tees don’t die from being worn — they die from being washed wrong. The good news is that with a few simple changes to your laundry routine, you can keep your favorite shirts looking fresh for years instead of months.
This is the complete, no-BS guide to washing graphic tees without ruining the print.
Why Do Graphic Tee Prints Crack, Fade, and Peel?
Before we fix the problem, let’s understand what’s actually happening to your shirts. Different printing methods react differently to washing:
| Print Type | How It Works | Weakness | Durability |
|---|---|---|---|
| Screen Print | Ink pushed through mesh onto fabric | Heat causes cracking | High (if cared for) |
| DTG (Direct to Garment) | Inkjet printed directly onto shirt | Fades with friction and heat | Medium |
| Heat Transfer/Vinyl | Design pressed onto fabric with heat | Peels with high heat | Medium-Low |
| Sublimation | Dye bonded into polyester fibers | Almost indestructible | Very High |
| Discharge Print | Removes dye, replaces with new color | Very durable — it IS the fabric | Very High |
The enemies of graphic prints are: heat, friction, harsh chemicals, and direct agitation. Every step in this guide targets these four villains.
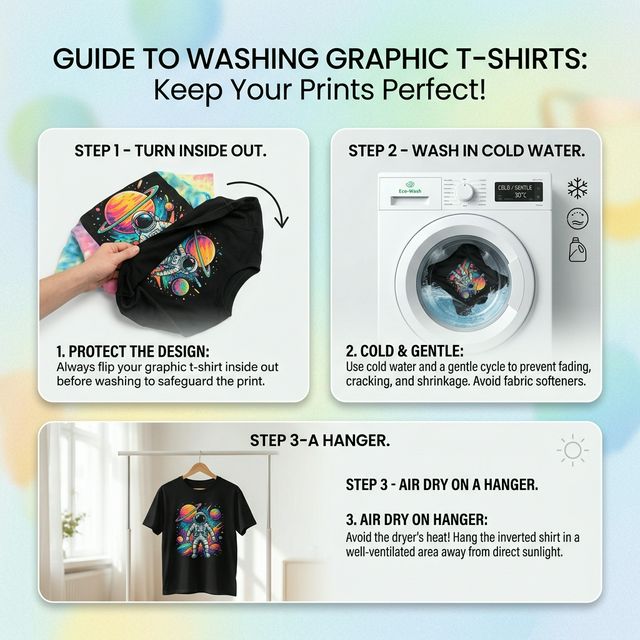
Step 1: Turn the Shirt Inside Out — Always
This is the single most important thing you can do, and it takes literally two seconds. Turning your graphic tee inside out before tossing it in the washer protects the print from:
- Friction against other clothes, zippers, and the drum wall
- Direct water pressure that can loosen ink adhesion over time
- Agitation damage from the wash cycle’s tumbling action
Pro tip: Turn it inside out BEFORE you put it in the laundry hamper. If you wait until laundry day, you won’t do it — because nobody sorts laundry with that level of commitment at 11 PM on a Sunday.
Step 2: Cold Water Only — No Exceptions
Hot water is a graphic tee’s worst enemy. Heat breaks down the bonds between ink and fabric, causing prints to crack, separate, and fade faster. Always wash your graphic tees in cold water (30°C / 86°F or below).
Cold water benefits for printed shirts:
- Preserves ink flexibility — cold water keeps screen print ink soft and pliable
- Prevents color bleeding — important for multi-color designs
- Saves energy — better for your wallet AND the planet
- Reduces fabric shrinkage — keeps the fit you love
Modern detergents are formulated to work perfectly in cold water, so there’s zero cleaning sacrifice. If you’re washing in hot water “to get them cleaner,” you’re just paying more to destroy your clothes faster.
Step 3: Use the Gentle or Delicate Cycle
The regular wash cycle uses aggressive agitation that flexes, stretches, and beats your shirts around the drum. Over time, this stress causes screen prints to crack along the creases and DTG prints to fade from surface abrasion.
Switch to the gentle/delicate cycle, which uses:
- Slower spin speeds
- Less aggressive tumbling
- Shorter wash duration
Your shirts will still get perfectly clean — they’re t-shirts, not mechanic’s overalls. They don’t need industrial-level agitation.
Step 4: Skip the Dryer — Air Dry Instead
If there’s a second “single most important rule” on this list, it’s this one. The dryer is where graphic tees go to die.
Here’s what high dryer heat does to your prints:
- Screen prints: Heat reactivates the plastisol ink, causing it to re-bond incorrectly and crack
- DTG prints: Heat accelerates fading and can cause the water-based inks to break down
- Heat transfers/vinyl: High heat literally melts the adhesive, causing peeling and bubbling
Best drying methods for graphic tees (ranked):
- Hang dry on a clothesline — outdoors or indoors, out of direct sunlight
- Lay flat on a drying rack — prevents shoulder bumps from hangers
- Hang on a wide, padded hanger — avoids the stretch marks that thin wire hangers leave
- Tumble dry LOW (last resort) — if you must use a dryer, use the lowest possible heat and remove immediately
Avoid direct sunlight while drying — UV rays fade printed designs just like they fade car paint.
Step 5: Choose the Right Detergent
Not all detergents are created equal when it comes to preserving prints. Here’s what to use and what to avoid:
| Use This | Avoid This |
|---|---|
| Mild liquid detergent | Powder detergent (abrasive granules) |
| Color-safe, gentle formula | Bleach or bleach-alternative |
| Fragrance-free options | Heavy fabric softeners |
| Half the recommended amount | Full cap of detergent |
Why less detergent? Excess detergent doesn’t rinse out completely and leaves residue on the print surface. Over multiple washes, this buildup dulls colors and accelerates cracking. Use half the recommended amount — your shirts will be just as clean.
Fabric softener warning: Liquid fabric softener coats fibers with a waxy layer that can interfere with print adhesion. If you want softness, use white vinegar (1/2 cup in the rinse cycle) as a natural alternative — it softens fabric without leaving residue.
Step 6: Wash Less Often
Here’s a radical idea: don’t wash your graphic tees after every single wear. Unless you’ve been sweating heavily or spilled something on it, most t-shirts can be worn 2-3 times before they need washing. Each wash cycle is one step closer to print degradation, so fewer washes = longer print life.
Quick freshening alternatives between washes:
- Hang in a well-ventilated area overnight
- Light spritz of fabric refresher spray
- Spot-clean any actual stains instead of full washes
- Freeze in a plastic bag overnight (kills odor-causing bacteria)
Step 7: Iron Correctly (or Don’t Iron at All)
If your graphic tee is wrinkled, never iron directly on the print. The heat from the iron will melt vinyl prints, crack screen prints, and destroy DTG designs on contact.
Safe ironing methods:
- Turn inside out and iron the reverse side only
- Place a thin cloth (pillowcase or flour sack towel) between the iron and the print
- Use a steamer instead — steam removes wrinkles without direct surface contact
- Use the lowest heat setting if you must use an iron
Best method? Hang dry your shirts properly and you’ll rarely need to iron them at all.
Step 8: Store Them Right
How you store your graphic tees affects their longevity too:
- Fold instead of hanging — long-term hanging stretches the collar and shoulders
- Don’t stack heavy items on top — pressure can cause prints to stick together
- Keep away from direct sunlight — UV exposure fades prints even in your closet
- Store in a cool, dry location — humidity promotes mildew that damages both fabric and ink
Emergency Rescue: What to Do If Your Print Is Already Damaged
If you’re reading this too late and your favorite shirt is already cracking, here are some last-resort options:
- Minor cracking: Apply a thin layer of fabric medium (available at craft stores) over the cracked areas and heat-set with an iron through a cloth. This won’t reverse damage but can slow further cracking.
- Fading: Unfortunately, faded ink can’t be restored. However, the vintage, faded look is trendy — embrace it as a retro aesthetic.
- Peeling vinyl: If vinyl is lifting, you can attempt to re-press it with a home heat press at low temperature, but success rates are low.
- Nuclear option: Accept that your shirt has lived a good life, retire it to “sleeping shirt” status, and buy a new one from Q-Finder.
The Complete Graphic Tee Care Cheat Sheet
| Step | Do This | Not This |
|---|---|---|
| Before washing | Turn inside out | Toss in print-side out |
| Water temp | Cold (30C / 86F) | Hot or warm |
| Cycle | Gentle/delicate | Regular/heavy |
| Detergent | Mild liquid, half amount | Powder, bleach, full cap |
| Drying | Air dry, no direct sun | Tumble dry high heat |
| Ironing | Inside out, low heat, cloth barrier | Direct iron on print |
| Storage | Fold, cool, dry, dark | Hang long-term, sunlight |
| Frequency | Wash every 2-3 wears | Wash after every wear |
Follow these steps and your graphic tees from Q-Finder will stay vibrant wash after wash. Premium prints deserve premium care.
Frequently Asked Questions
Can I put graphic tees in the washing machine?
Yes, graphic tees can absolutely go in the washing machine — just make sure to turn them inside out, use cold water, and select the gentle or delicate cycle. Avoid hot water and heavy-duty cycles, which cause excessive friction and heat that damage prints. Most modern graphic tees are designed to be machine-washable when proper care is taken.
How do I stop my graphic tee from cracking?
The main causes of print cracking are heat and repeated stress. To prevent it, always air dry instead of using the dryer, wash inside out on cold/gentle, use minimal detergent, and never iron directly on the printed area. Heat is the biggest culprit — eliminating the dryer alone can double your print’s lifespan.
Is it better to hand wash or machine wash graphic tees?
Hand washing is gentler and technically better for print longevity, but a machine wash on the delicate cycle with cold water is perfectly fine for most graphic tees. The key difference is minimal — what matters most is avoiding heat (both in washing and drying), turning the shirt inside out, and using mild detergent. Unless it’s a rare vintage piece or hand-painted, machine gentle cycle will serve you well.
